Are you tired of missing out on highly sought-after concert tickets, sports events, or limited-edition releases? Do you spend countless hours manually hitting the refresh button, only to be met with disappointment as tickets vanish in a flash? If you’re an avid event-goer or simply someone who needs to stay ahead in a fast-paced digital world, you know the frustration. The blink-and-you’ll-miss-it nature of online ticket sales can be a nightmare. But what if there was a way to level the playing field, to give yourself an edge in securing those elusive spots?
Imagine a tool that tirelessly monitors web pages for you, automatically refreshing them at custom intervals, ensuring you’re always among the first to see updates, new stock, or ticket releases. This isn’t a dream; it’s a reality with auto-refresh functionality in your web browser. Specifically, learning how to add auto refresh to Chrome can transform your online experience, turning manual tedium into automated efficiency. This comprehensive guide will walk you through everything you need to know, focusing on the best solutions available and how they can benefit you, especially if you’re an event ticket buyer aiming for that ultimate edge.
Why Event Ticket Buyers Desperately Need Auto Refresh
For anyone who’s ever tried to snag tickets to a sold-out show or a popular sporting event, the struggle is real. Websites often crash, tickets appear and disappear in seconds, and manual refreshing simply isn’t fast enough. Here’s why auto-refresh is a game-changer for you:
- Speed is Everything: In the world of high-demand tickets, every millisecond counts. An auto-refresh tool can check for updates far more frequently and consistently than any human ever could.
- Beat the Bots (or at least keep up): While sophisticated bots are out there, many everyday users miss out simply due to slow reaction times. Auto-refresh helps close that gap, ensuring you’re alerted the moment something changes.
- Eliminate Manual Tedium: No more endless F5 key presses. Free up your hands and your mind while your browser does the heavy lifting.
- Stay Ahead of Restocks: Sometimes tickets are released in waves, or previously sold-out events get new allocations. An auto-refresh tool can immediately spot these restocks, giving you a crucial advantage.
- Monitor Multiple Pages: Trying to track tickets for different events or different sections of the same venue? Auto-refresh allows you to set up monitoring for various tabs simultaneously.
Introducing Auto Refresh Chrome: Your Essential Tool
While there are various ways to add auto refresh to Chrome, the most user-friendly and feature-rich method is through browser extensions. Among these, the Auto Refresh Chrome extension stands out as the ultimate solution for anyone needing reliable, customizable, and efficient page monitoring, especially for discerning event ticket buyers. This powerful auto refresh plugin is designed to provide seamless automatic page reloading, robust page monitoring, and flexible custom intervals, ensuring you never miss critical updates again. Its intuitive interface and comprehensive features make it the best auto refresh software for the job. You can find more details and download the extension at https://autorefresh.page/.
How to Install the Auto Refresh Chrome Extension
Getting started with Auto Refresh Chrome is straightforward. Follow these steps to install and begin using this invaluable tool:
- Open the Chrome Web Store: Launch your Google Chrome browser. Click the three-dot icon in the top right corner (the “Customize and control Google Chrome” menu). Navigate to “More Tools,” then select “Extensions.” On the Extensions page, click the three horizontal bars in the top left to open the menu, then click “Open Chrome Web Store” at the bottom.
- Add to Chrome: Locate the “Auto Refresh Page” extension in the search results. Click the “Add to Chrome” button next to it. A pop-up window will appear asking for confirmation. Click “Add Extension.”
- Pin the Extension (Optional but Recommended): After installation, the extension icon might appear as a puzzle piece icon. Click this puzzle piece icon in your browser’s toolbar, find “Auto Refresh Chrome” in the list, and click the pin icon next to it. This will make the Auto Refresh Chrome icon directly visible in your toolbar for quick access.
Configuring Auto Refresh Chrome for Optimal Ticket Hunting
Once installed, configuring Auto Refresh Chrome to meet your specific needs is simple. This is where its power truly shines for event ticket buyers.
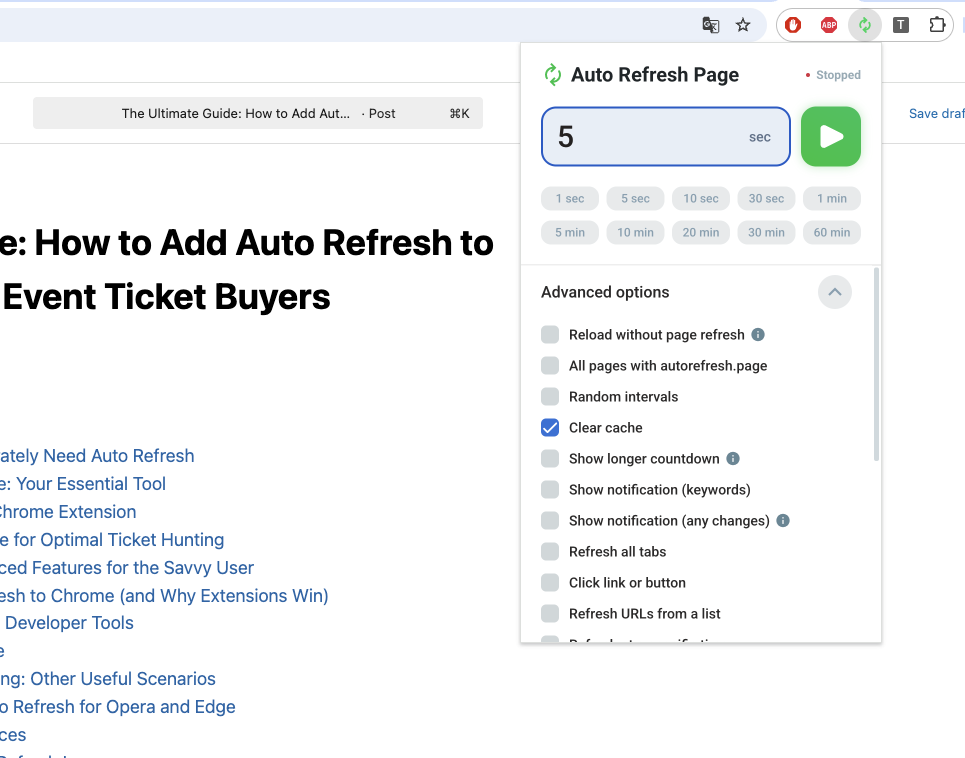
- Access the Extension: Click the Auto Refresh Chrome icon in your browser toolbar. A small pop-up window will appear.
- Set Your Refresh Interval: This is crucial for ticket sales. You can enter a custom interval in seconds, minutes, or even hours. For high-demand tickets, you’ll want a short interval, perhaps between 5 to 30 seconds. Experiment to find what works best without overwhelming the website you’re monitoring.
- Start the Refresh: Once your desired interval is set, click the “Start” button. The current tab will now begin refreshing automatically at your specified frequency. You’ll see a countdown timer on the extension icon indicating the time until the next refresh.
- Stop the Refresh: To stop the auto-refresh, simply click the Auto Refresh Chrome icon again and then click “Stop.”
- Per-Page Settings: A great feature is the ability to save unique refresh settings for different websites. This means you can have one setting for a concert ticket site and another for a slower-updating news page.
Beyond Basic Refreshing: Advanced Features for the Savvy User
Auto Refresh Chrome isn’t just about repeatedly hitting F5. It offers a suite of advanced features that can give you a significant advantage:
- Page Monitoring with Keyword Alerts: This is a standout feature for ticket buyers. You can set the extension to monitor the page for specific keywords (e.g., “Tickets Available,” “Buy Now,” “Add to Cart”). If these keywords appear after a refresh, the extension can trigger a notification (push notification, sound alert, or even email), ensuring you’re immediately aware of changes without constantly staring at the screen. This is a game-changer for real-time updates.
- Visual Countdown Timer: Many auto-refresh tools, including Auto Refresh Chrome, display a visual countdown directly on the extension icon or even on the webpage itself. This lets you know precisely when the next refresh will occur.
- Hard Refresh Option: For some websites, clearing the cache with each refresh can be vital to ensure you’re always seeing the absolute latest version of the page, not a cached one. Auto Refresh Chrome includes a “hard refresh” option for this purpose.
- Synchronization Across Devices: Imagine setting up your ticket alerts on your desktop and having those settings automatically sync to your laptop or another Chrome browser. Auto Refresh Chrome offers a built-in sync system, allowing you to synchronize your settings across multiple devices by creating an account. This is incredibly convenient for managing your alerts from anywhere.
- Multiple Settings Profiles: For even greater flexibility, you can create multiple settings profiles, allowing you to quickly switch between different refresh configurations depending on what you’re monitoring.
Other Methods to Add Auto Refresh to Chrome (and Why Extensions Win)
While extensions are the recommended approach, it’s worth understanding other methods to add auto refresh to chrome for context.
Using JavaScript in Chrome Developer Tools
For more technically inclined users, you can use JavaScript directly in Chrome’s Developer Tools.
- Open Developer Tools: On the page you want to refresh, press
Ctrl + Shift + I(Windows) orCmd + Shift + I(Mac) to open Chrome’s Developer Tools. - Go to the Console Tab: Click on the “Console” tab.
- Enter JavaScript: Type a script like this:
setInterval(function(){location.reload()}, 10000);This script will refresh the current page every 10,000 milliseconds (10 seconds). You can adjust10000to your desired interval in milliseconds. - Execute: Press Enter.
Pros: No extension needed, high degree of control. Cons: Requires technical expertise, needs to be re-entered if you close the tab, not user-friendly, and some websites might detect or block this. It also lacks features like keyword monitoring or per-page settings that auto refresh software offers.
Using a Third-Party Website
Some websites offer a “page refresher” service where you input a URL and a refresh interval, and they handle the refreshing.
Pros: No installation needed in your browser. Cons: You’re reliant on another website, often cluttered with ads, and it doesn’t integrate directly with your browsing experience. It’s generally less secure and less convenient than a dedicated auto refresh plugin.
For most users, especially event ticket buyers who need reliability and advanced features, sticking with a robust extension like Auto Refresh Chrome is undeniably the superior choice.
Auto Refresh Beyond Ticket Buying: Other Useful Scenarios
While securing event tickets is a prime use case, the ability to add auto refresh to chrome has numerous other applications in your daily online life:
- Monitoring Online Stock: Whether it’s a rare collectible, a new gadget release, or just an item back in stock, auto-refresh helps you catch inventory changes immediately.
- Tracking Live Scores or News Feeds: Keep an eye on a sports game, breaking news, or a live blog without constant manual refreshing.
- Job Boards and Project Postings: Get instant updates on new job listings or project opportunities as they are posted, especially useful on dynamic sites.
- Social Media Monitoring: Want to follow a rapidly updating
auto refresh twitterfeed or aauto refresh googlenews search for specific trends? Auto-refresh can keep you current. - Development and Testing: Web developers can use auto-refresh to see immediate changes to their code in the browser.
- Auction Site Bidding: Stay on top of last-minute bids on auction sites.
The versatility of an auto refresh plugin like Auto Refresh Chrome makes it an indispensable tool for anyone who needs to stay informed and react quickly to online changes.
Multi-Browser Compatibility: Auto Refresh for Opera and Edge
While this guide focuses on how to add auto refresh to chrome, it’s worth noting that many popular auto refresh software solutions, including certain versions of Auto Refresh Plus (a close relative in functionality to Auto Refresh Chrome), offer auto refresh opera and auto refresh edge compatibility. This means you can often enjoy similar auto-refreshing capabilities across your preferred browsers, ensuring your productivity isn’t limited by your browser choice. The core concepts of setting intervals and monitoring pages remain consistent, regardless of the browser.
Tips for Success and Best Practices
To get the most out of your auto-refresh extension and avoid potential pitfalls, consider these tips:
- Respect Website Servers: While it’s tempting to set refresh intervals to 1 second, this can put unnecessary strain on website servers and may even get your IP temporarily blocked by some sites if detected as malicious activity. Start with a reasonable interval (e.g., 5-10 seconds for very dynamic pages, 30-60 seconds for less critical ones) and adjust as needed.
- Use Keyword Monitoring Wisely: For ticket sites, identify the exact text that appears when tickets become available (“Buy Tickets,” “Add to Cart,” “Tickets On Sale”). This is more reliable than just refreshing.
- Stay Logged In: Ensure you are logged into the ticket vendor’s site before you start auto-refreshing, if required. This saves crucial time when tickets do become available.
- Combine with Alerts: Don’t just rely on visual cues. Use the sound and push notification alerts offered by Auto Refresh Chrome so you don’t have to constantly watch the screen.
- Understand Limitations: Auto-refresh extensions typically do not work on Chrome internal pages (e.g.,
chrome://pages or the Chrome Web Store) or pages with very specific anti-bot measures.
Troubleshooting Common Auto-Refresh Issues
Sometimes, an auto-refresh tool might not work as expected. Here are some common issues and how to troubleshoot them:
- Extension Icon Missing/Greyed Out:
- Solution: Check if the extension is enabled in
chrome://extensions. Ensure it’s pinned to your toolbar.
- Solution: Check if the extension is enabled in
- Page Not Refreshing:
- Solution: Verify the refresh interval is correctly set and the “Start” button was clicked. Check if the website has any unique security measures that might be blocking the refresh. Try the “hard refresh” option if available. Ensure you’re not on a Chrome internal page.
- Website Blocking Refreshes:
- Solution: Some sophisticated websites detect automated refreshes. If this happens, you might need to increase your refresh interval or try a random interval feature if your extension offers one. In rare cases, a website might entirely block auto-refreshing.
- Performance Issues:
- Solution: Running too many auto-refreshing tabs with very short intervals can consume significant system resources. Reduce the number of active tabs or increase refresh intervals if your browser slows down.
- Keyword Alert Not Triggering:
- Solution: Double-check the exact spelling and casing of your monitored keywords. Ensure the keyword actually appears on the refreshed page’s source code. Sometimes text is generated dynamically and might not be visible to the monitoring function.
By understanding these common challenges and their solutions, you can ensure a smoother experience when you add auto refresh to chrome.
Conclusion: Empowering Your Online Experience
In a world where speed and immediate access are paramount, learning how to add auto refresh to chrome is no longer a luxury but a necessity for many, especially dedicated event ticket buyers. While manual refreshing is a tedious and often fruitless endeavor, and advanced scripting requires specific technical know-how, the advent of powerful, user-friendly auto refresh plugin solutions has democratized this capability.
The Auto Refresh Chrome extension stands out as the premier auto refresh software, offering an unparalleled combination of ease of use, robust features like page monitoring and keyword alerts, and multi-device synchronization. By leveraging this tool, you empower yourself to stay ahead of the curve, whether you’re battling for concert tickets, monitoring vital stock updates, or simply keeping an eye on dynamic content.
Don’t let valuable opportunities slip through your fingers due to outdated manual methods. Take control of your online browsing experience today. Visit https://yourprojectpage.com to download the Auto Refresh Chrome extension and transform the way you interact with the web. Your next successful ticket purchase (or crucial online update) might just be a refresh away.
Frequently Asked Questions (FAQs)
Q1: Is it safe to use an auto-refresh extension on popular websites?
A1: Generally, yes, but exercise caution. While extensions like Auto Refresh Chrome are designed to be safe, setting extremely short refresh intervals (e.g., less than 2-3 seconds) on high-traffic websites can sometimes be perceived as abusive behavior by the website’s server, potentially leading to a temporary IP ban. Always use reasonable intervals.
Q2: Can Auto Refresh Chrome monitor multiple tabs simultaneously?
A2: Yes, Auto Refresh Chrome allows you to set different refresh preferences for various pages and tabs. You can configure each tab independently, ensuring you can monitor multiple event ticket pages or other critical sites at the same time.
Q3: What is the main benefit of “Page Monitoring with Keyword Alerts” for ticket buyers?
A3: This feature is revolutionary for ticket buyers because it frees you from constantly staring at the screen. Instead of just refreshing, the extension actively scans the page for specific phrases like “Tickets Available” or “Buy Now.” When detected, it can trigger an immediate audible or visual alert, allowing you to react instantly the moment tickets drop.
Q4: Does Auto Refresh Chrome clear my cache with each refresh?
A4: Auto Refresh Chrome offers a “hard refresh” option, which clears the webpage cache data during each automatic refresh. This ensures that you are always loading the freshest content and not an outdated version stored in your browser’s cache, which is vital for dynamic content like ticket availability.
Q5: Will auto-refresh extensions work on all websites?
A5: Most auto-refresh extensions, including Auto Refresh Chrome, work on the vast majority of websites. However, they typically do not work on Chrome internal pages (e.g., chrome:// settings pages or the Chrome Web Store itself) due to browser security restrictions. Additionally, some highly secured websites with advanced bot detection may block or interfere with automated refresh attempts.
Unleash the Power of Automation: Never Miss Out Again!
You’ve learned the ins and outs of how to add auto refresh to chrome, understanding its incredible potential, especially for event ticket buyers and anyone needing to stay updated in real-time. The days of endlessly hitting F5 are over. With the right auto refresh software, like the robust Auto Refresh Chrome extension, you gain a significant advantage in the competitive online landscape.
Ready to secure those coveted tickets or effortlessly monitor critical web pages? Don’t wait. Empower your browsing experience and make sure you’re always one step ahead. Take action now – the ultimate solution is just a click away.
Get the Auto Refresh Chrome extension today and revolutionize your online vigilance!